Bassoon reeds - how to adjust them
June 6th, 2018
Bassoon reeds - how to adjust them
Article Author: Oliver Ludlow, In-House-Bassoon Specialist and Director at Double Reed Ltd.
Bassoon reeds are an endless worry for many bassoonists – selecting the right reed for your bassoon and playing style is just the start. How long will it take to bed in? How long will it last? How can I adjust it to optimise performance and extend its playing life? These are just some of the issues bassoonists face.
The material bassoon reeds are made from (giant cane reed), and their delicate design, means that reeds will sometimes need adjusting before they will play satisfactorily. Of course, what qualifies as a ‘satisfactory’ reed partly depends on what the bassoonist is looking for, but there are some basic rules to bear in mind when selecting and optimising any bassoon reed.
In this article we cover what makes a good reed and how to adjust your reeds to ensure you are getting the best out of them for as long as possible.
What makes a good bassoon reed?
Take a look at the anatomy of a bassoon reed in the first diagram – we will be referring to this diagram throughout the article.

All steps discussed in this article should be carried out on a reed which has been soaked in clean water for 5 minutes.
Reed cane is fickle – changing temperatures and varying degrees of atmospheric moisture can cause a reed to change its shape. Since bassoon reeds are always soaked before use, it is sensible to make any adjustments to the reed in this state (so that you are making changes to it in as close to playing condition as possible, and to reduce the risk of the cane splitting).
Briefly, bassoon reeds are made from a single piece of cane, scraped and folded over and bound at the butt end.
Leaving personal sound preferences aside, a good reed will be well-balanced – in order to play and vibrate properly, it should be evenly scraped and symmetrical in shape and thickness in each of its key areas. A reed should be free-blowing enough to accommodate a loose, comfortable embouchure without causing unnecessary strain on the player’s lips or lungs, but not so free as to prevent the player’s ability to play quietly and control the volume. The crow sound produced when blowing a well-balanced reed should be a rich, multi-phonic sound.
It is important to remember that bassoon reeds need blowing-in before they reach their optimum hardness and playability – they will settle over a period of days, which means making adjustments early on risks producing an ‘over-adjusted’ reed after it has settled.
Take a close look at the reed tip opening
Once soaked, the first step to identifying a good reed is to check its tip - the opening should be between 1-1.5mm wide (or 10% of the width of the tip), and should have an even, symmetrical curve on both the top and bottom reed blade, as well as corners that are cut off at a 45-degree angle. Reeds which have noticeably mis-shapen tip openings after a thorough soaking will play less effectively.
The tip should be very fine, smooth and paper thin – any standing fibres will affect playability, and make it harder to blow the reed effectively.
If the reed blades at the tip of the reed are too thick, the reed will be more difficult to play loudly, it will be less responsive and may become slightly sharp. The easiest and least risky way to thin the reed blades at the tip opening is to lay a very fine, polishing sandpaper onto a flat stable surface, and gently sand each blade tip (holding the reed at a 25 degree angle).
If you choose to sand the tip of your reed, play test it again before moving on to any other step in this article.
Check the wire tightness
The next element to check is whether the wires are appropriately tight once soaked – loose wires which are able to move up and down the reed collar will make the reed blades vibrate too much, will require more blowing effort from the player, and will result in a low-pitched, distorted crow.
Wires which are too tight will choke the reed blades and restrict their ability to reach a well-balanced crow sound, resulting in a reduction in the lower overtones and producing a higher-pitched sound.
If the wires are appropriately tight, then do not adjust them every time you play or too early on in the process – the reed maker will have fixed the wires precisely, and each time they are adjusted brings them further from their intended shape and tightness (which is sometimes difficult to reverse if the wires are too mis-shapen or develop kinks). However, you may find that the wires need adjusting every 3-4 weeks regardless of how they are in the beginning, as reeds have a tendency to change shape the more they are used.
If the tip opening of the reed needs closing slightly, then gently squeeze the two blades together along either side of the reed spine with your fingers before making any other adjustments – this is sometimes enough to achieve the required opening width without needing to tighten or squeeze the reed’s wires prematurely.
To tighten or loosen the wires, insert a mandrel into the base end of the reed, unflatten the twisted end of the wire with a pair of pliers, pull the end of the wire gently away from the reed, and make a quarter turn in either direction until you’ve reached the optimum tightness.
Squeezing the wires
Squeezing the first and second wires is the quickest way to make adjustments to a bassoon reed. Take care not to over-squeeze or pinch either side of the wire unevenly. Any mis-shapen wires or wires with kinks will cause the reed to play less effectively.
Wire no.1 – squeezing from the sides
In order to widen the tip opening and produce a more resistant reed, squeeze wire no.1 from the sides with your thumb and forefinger or a pair of pliers. The sound will become darker and slightly higher pitched, the reed will become slightly more difficult to control and will project more.
It is important to remember that wire no.1 should be oval - overdoing the adjustment and making the wire too round will cause lower notes to play sharp.
Wire no.1 – squeezing from the top and bottom
In order to narrow the tip opening and produce a less resistant reed, squeeze wire no.1 from the top and bottom. The sound will become brighter and slightly lower pitched, and the will become more easy to control, quieter and easier to blow.
It is important not to overdo these adjustments, if wire no.1 becomes too flat you will find that higher notes tend to play flat and the reed will become hard to control.
Tip:your reed tip will naturally close up slightly when played owing to lip pressure – if it is too open to begin with it is worth playing the reed for 30 minutes and assessing after this before adjusting the wires.
Wire no.2 – squeezing from the sides
In order to narrow the tip opening and produce a slightly less resistant reed, squeeze wire no.2 from the sides. The sound will become reedier, higher registers will be more prominent, and you will find the reed takes less effort to blow.
Make sure to keep this wire as round as possible, if it becomes mis-shapen or too oval the lower notes will become less responsive.
Wire no.2 – squeezing from the top and bottom
In order to widen the tip opening and produce a slightly more resistant reed, squeeze wire no.2 from the top and bottom. The sound will become slightly darker (especially in the lower registers) and slightly higher pitched. Make sure to keep this wire as round as possible, if it becomes mis-shapen or too oval the lower notes will become less responsive.
We recommend squeezing wire no.2 as little as possible, as doing so can lead to negative effects in other areas of the reed – it can create harsher overtones, cause the sound to become too soft, and can produce a slightly more mono-phonic crow.
Reed blade thickness
Next, with a reed plaque inserted, closely examine each of the reed blades – each blade should have a smooth, evenly-sloped surface. If you can see any protruding ridges anywhere on either of the blades, this will indicate that the cane hasn’t been scraped evenly enough, and will result in a stiffer reed, with a flatter, mono-phonic crow.
In addition, if you can see that any particular areas are uneven, thicker or lumpier than others, this will affect the reed’s ability to vibrate and blow freely, and therefore negatively impact the sound it produces. It is important to note that the reed blade thickness should be as similar on each blade, and on either side of the reed spine, as possible.
To adjust the thickness of the reed in any particular area you can scrape the blade with a sharp knife, or a file, with a mandrel and reed plaque inserted. We recommend that you take very small amounts off at a time so as to not over-do the adjustment.
You may find that one reed blade will scrape more easily than the other, so be careful to adjust the amount you scrape accordingly.
Tips on scraping bassoon reeds:
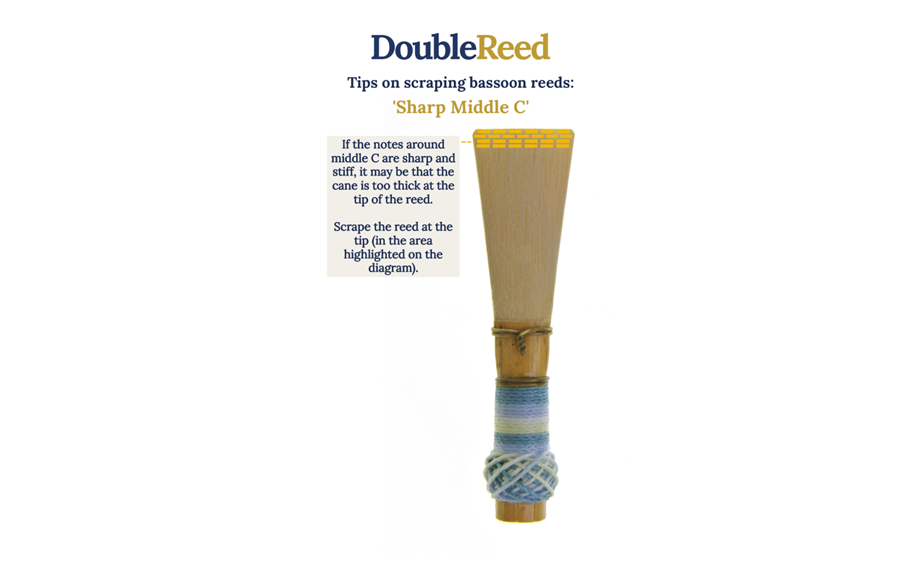
- Sharp Middle C
If the notes around middle C are sharp and stiff, it may be that the cane is too thick at the tip of the reed. Scrape the reed at the tip (in the area highlighted on the diagram).
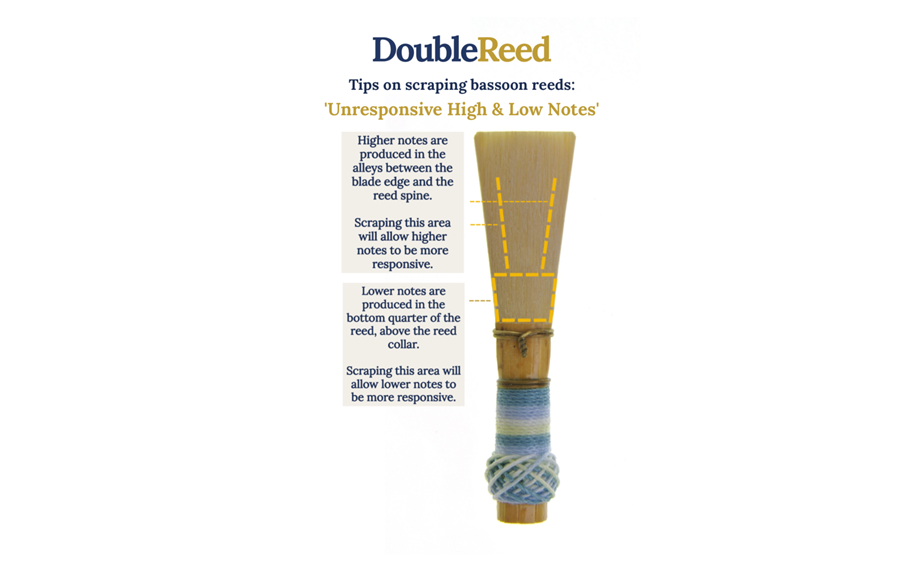
- Unresponsive High Notes
Higher notes are produced in the channels between the blade edge and the reed spine. Scraping this area will allow higher notes to be more responsive.
- Unresponsive Low Notes
Lower notes are produced in the bottom quarter of the reed, above the reed collar. Scraping this area will allow lower notes to be more responsive.
- Stiff and Hesitant Notes
If the tone produced is stiff and hesitant across all notes, it may be that the cane is too thick across the whole reed. Scrape the reed taking care to avoid taking too much from the spine and heart of the reed - scrape more from the brighter areas as highlighted on the diagram.

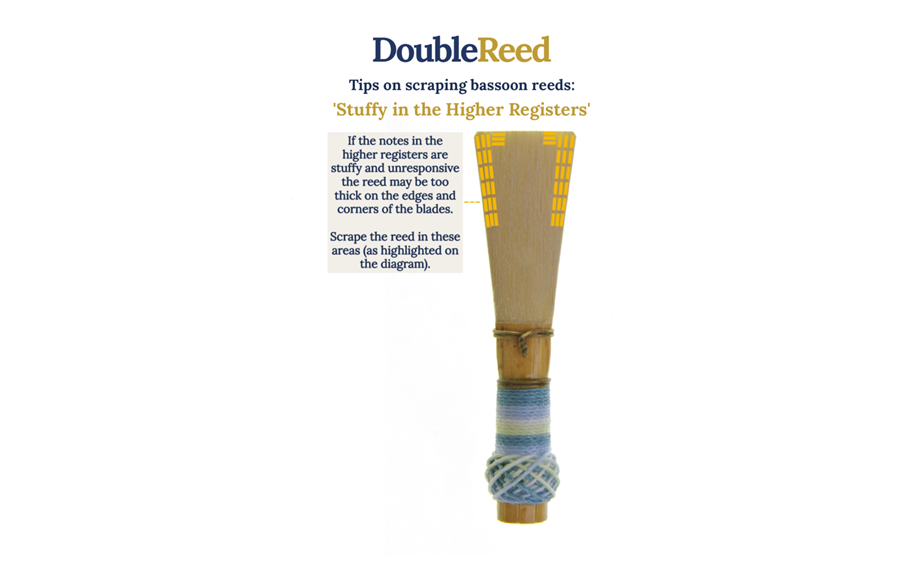
- Stuffy and Unresponsive Higher registers
If the notes in the higher registers are stuffy and unresponsive the reed may be too thick on the edges and corners of the blades. Scrape the reed in these areas (as highlighted on the diagram).
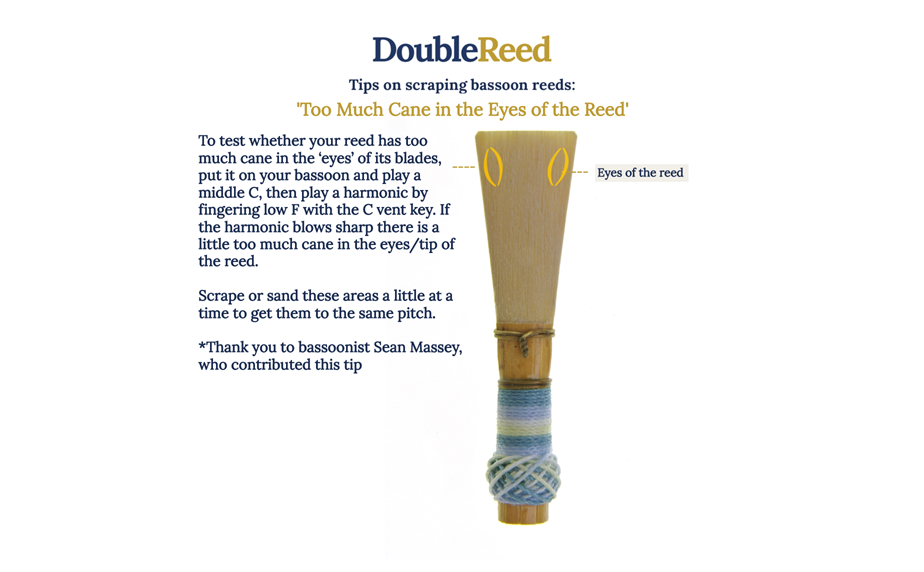
- Too much Cane in the eyes of the reed
To test whether your reed has too much cane in the ‘eyes’ of its blades, put it on your bassoon and play a middle C, then play a harmonic by fingering low F with the C vent key. If the harmonic blows sharp there is a little too much cane in the eyes/tip of the reed. Scrape or sand these areas a little at a time to get them to the same pitch.
*Thank you to bassoonist Sean Massey, who contributed this tip
After Scraping
Once you have scraped the reed, sand it off very gently with some very fine polishing sandpaper to smooth the surface, and then clean it off with a small brush and clean water.
This article has covered the basics of bassoon reed adjustment, we will be covering these elements in more detail in upcoming articles in this series.
